When it’s time to replace your roof, the decisions you make up front can impact your home’s protection, value, and energy efficiency for decades. A new roof installation isn’t just a construction project—it’s a long-term investment in your home’s safety and performance.
Whether you’re dealing with an aging roof or recent storm damage, this guide covers the essential factors to consider before, during, and after installing a new roof.
Key Factors to Consider Before Installing a New Roof
Installing a new roof requires more than just choosing materials. To get the best results, it’s important to approach the project with clarity and preparation.
1. Assessing the Need for a New Roof
Are you seeing signs of trouble? Common indicators include:
- Persistent leaks or water stains on your ceiling
- Missing, cracked, or curling shingles
- Sagging roofline or soft spots in the attic
- Granule loss and visible wear
If you’re unsure, this guide to signs you need a new roof can help you make an informed decision.
2. Budgeting for Roof Installation Cost
Roof installation cost depends on several factors: material type, roof size, complexity, and location. On average, roof replacement ranges from $10,000 to $25,000+ for a typical home. This article breaks down roof replacement costs in detail.
Be sure to budget for unexpected repairs (like damaged decking) and upgrades like underlayment or improved ventilation.
3. Choosing the Right Roofing Material
From asphalt shingles to metal or composite options, selecting the best material depends on your climate, aesthetic preferences, and how long you plan to stay in the home. Learn more about how to choose the right roofing material here.
4. Hiring a Qualified Roofing Contractor
Always consult with multiple roofing contractors and check reviews. Look for professionalism, responsiveness, and transparency. Ask about warranties and certifications. For example, Orca Roofing & Exteriors offers expert contractors and excellent roofing services.
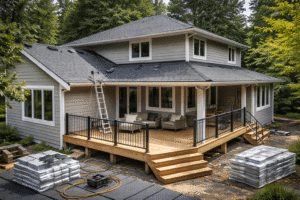
The Roof Installation Process: What to Expect
Understanding the process ahead of time can help you plan and avoid surprises.
Step-by-Step Overview
- Initial Inspection: The roofer will assess your current roof condition and measure your roof.
- Material Selection & Estimate: You’ll receive options and a detailed quote based on your preferences.
- Preparing the Home: This includes protecting landscaping and setting up safety equipment.
- Tear-Off: Old roofing material is removed to inspect the decking.
- Underlayment & Flashing: Waterproof barriers like ice and water shield are applied for leak protection.
- New Roof Installation: Shingles or panels are installed according to manufacturer guidelines.
- Final Cleanup & Walkthrough: Debris is cleared and the contractor verifies quality.
Final Thoughts: Is Now the Time for a New Roof?
A quality roof protects your home, improves energy efficiency, and boosts resale value. If your current roof is aging or showing signs of failure, installing a new one may be the best decision for your home’s long-term health.
At Orca Roofing & Exteriors, we help Puget Sound homeowners make confident, informed roofing decisions. We’re here to guide you through the process—from material selection to final inspection—with top-tier craftsmanship and full transparency.
👉 Ready to start your new roof installation? Contact us now.
FAQs About New Roof Installation
What should I check after having a new roof installed?
After your new roof installation, inspect the following:
- Shingle alignment – Check for even rows and consistent patterns.
- Flashing – Ensure it’s properly sealed around chimneys, skylights, and vents.
- Gutter cleanliness – Roofers should remove debris and nails.
- Ventilation – Confirm attic vents are unobstructed and functioning.
- Cleanup – Nails, packaging, and leftover materials should be removed from your yard.
- Request a final walkthrough with your contractor to address any concerns.
How long does it take to install a new roof?
Most residential roof installations take 1 to 3 days, depending on:
- Roof size and slope
- Weather conditions
- Material type (e.g., asphalt is faster than slate)
- Any needed repairs to decking or structure
Larger or complex roofs may take longer, especially if weather causes delays.
What to check after roofers install a new roof?
Along with shingles and flashing, make sure to check:
- Warranty paperwork
- Permits finalized
- Photos of work (before/after if available)
- Proper attic ventilation
- No leaks after the first rainfall
It’s also smart to confirm that ice and water shield or underlayment was used where required.
How do you install a new roof?
Roof installation typically follows this sequence:
- Tear off old roofing
- Inspect and repair decking
- Install underlayment and ice & water shield
- Install drip edge and flashing
- Lay shingles or roofing panels
- Finish with ridge caps and vents
- Final inspection and cleanup
Hiring a licensed contractor like Orca Roofing & Exteriors ensures that each step is performed to code, with high-quality materials and expert craftsmanship. Proper installation is key to maximizing your roof’s lifespan and warranty coverage.